getting the room ready for prep and paint
removing smaller articles (the fewer things in the room the better)
movement and placement of furniture
dealing with ceiling lights and smoke detectors
removing plate covers/taping around odd plate covers
dealing with door handles; door hinges; curtain, blind and cabinet hardware; and bathroom hardware
covering up hardwood and/or tile floors
covering up carpet
covering up the furniture
Over the next three chapters, we'll cover the entire painting process. What I’m about to show you will work for any room.
The first thing you need to do is get the room ready for prep and paint. This entails moving the furniture, taking down blinds, pictures, curtains, removing plate covers, etc. Then we will cover everything up.
removing smaller articles (the fewer things in the room the better)
You should remove all the small articles and small pieces of furniture from the room. The fewer things you have in the room, the better, as there will be less to get in your way. If you have pieces of furniture that you need to move, and those pieces have breakable items inside them, you should remove or secure those breakable items before you move the furniture.
movement and the placement of furniture
If you are working over a hardwood or tile floor, be very careful when moving the furniture as you don’t want to scratch your floor. If you have someone to help you that would be ideal. If you are on your own and can lift one side of the object, you should put it on folded up rags or furniture sliders. You can then carefully slide the object where you'd like. If you are by yourself, fold up a rag or take a slider and place it right next to the legs of the object. Lift the object up just a bit and, using your feet, push the rag or slider under the legs.
Now the placement of the furniture is important. You want to make sure you have at least 3-4 feet from the wall so you have room to get yourself and a ladder in that space.
If you are painting the ceiling, try not to put all of the furniture in the middle of the room. Create pathways that are wide enough for yourself and a ladder so you have better access to the ceiling. Make sure you have access to lights, smoke detectors, beams, etc. If you do not have this kind of room, do the best you can.
dealing with ceiling lights and smoke detectors
cam lights
Most ceiling cam lights are removed the same way: you remove the bulb (make sure the light is off), then remove the baffle which is usually held in with a couple of springs or metal clips.
I like to remove cam lights as it's easier to paint, but you could tape around them. If you tape up the cam, make sure the tape is only on the cam and that there is no tape on the ceiling.
light fixtures
With some pendant lights, you can remove just the base plate as the light is usually secured to the wiring junction box, but pay close attention to how they are installed. Sometimes you'll pull off a couple of cap screws and you'll find you need to take the entire light down; if you pull the small-cap screws off, the only thing that will be keeping the light from falling to the floor is the wiring, so be very careful here.
For most medium and large lights, taping around the base is much easier.
smoke detectors
The battery only powered smoke detectors can easily be removed from the ceiling.
If it's hardwired, grab and spin the smoke detector until it releases from the base plate and simply let it hang from the ceiling.
I will usually pull the bracket that holds it in place instead of taping and painting around it.
removing plate covers/taping around odd plate covers
Remove all switch plate covers and place them into a plastic bag or empty drawer keeping all the screw and plates together.
If a certain plate requires a special or odd size screw, simply tape the screws and the plate together and mark them clearly so you know exactly where they go.
If you are having a hard time removing the screws but can get them at least part way out, that's fine. Simply pull the plate away from the wall a bit, then tape around the edges of the plate.
If you have cable or telephone jack plates, partially remove the screws and pull the plate a little ways from the wall, then tape around the edge of the plate.
If a plate has been painted to the wall, carefully take a box cutter or a snap blade knife and cut along the edge where the wall meets the plate until the plate comes loose.
If you have children or pets, please be careful that they do not have access to the electrical outlet. I tape up the outlets to protect them from paint, and from children and pets.
dealing with door handles; door hinges; curtain, blind and cabinet hardware; and bathroom hardware
door handles/knobs
You can either remove, or tape around door handles. I will usually take them off depending on how easy it is to remove them. Sometimes door handle removal or installation can be intricate, so in those cases, I will simply tape around them.
If you are worried about touching the handle or knob with your screwdriver, take some safe release tape and tape up the handle with a couple pieces of tape. Then, if you accidentally hit the handle with your screwdriver, the handle will be protected.
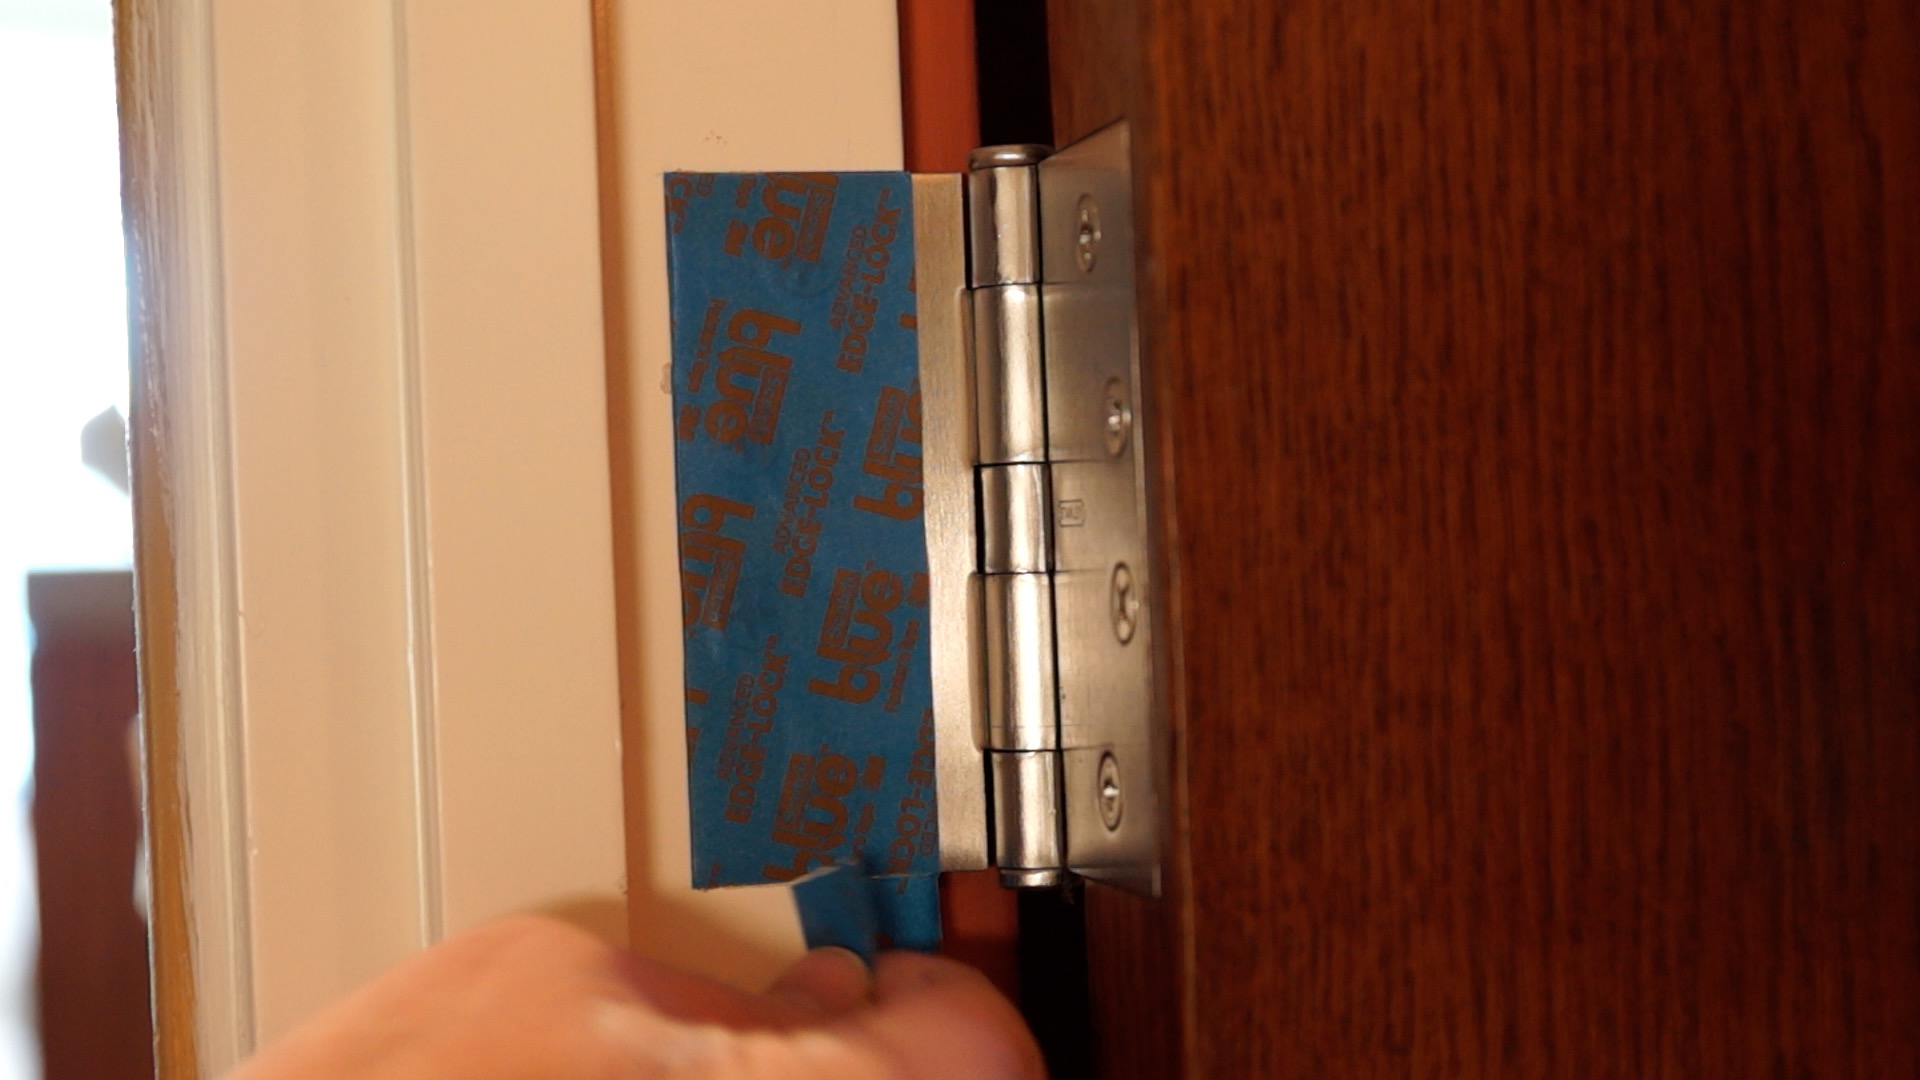
door hinges
If you are not taking your doors off, then you should tape around the hinges.
Take a piece of 1.5" safe release tape that's just a bit longer than the hinge. Cover the hinge by lining up the edge of the tape to the long vertical side of the hinge. Using your fingernail or the like, score a line in the tape between the top of the hinge and the door or door frame. Then do the same with the bottom of the hinge. Carefully take your box knife, or a sharp razor blade, and cut where you scored the tape. Then simply remove the excess tape.
curtain rods and brackets
There are two ways to deal with curtain rod brackets; one is to remove them, the other is to tape and paint around them.
If you remove them, I recommend marking all of the screws and brackets taking note of exactly where they were removed from.
If you decide to paint around them, I'd remove the curtains and the rods, then unscrew the brackets just a little so you can pull the bracket away from the wall just a bit; this makes it easier to tape around.
blinds
How blinds are secured vary widely, so find out how they are installed and simply take them down.
With blinds, you can remove the brackets or leave them. If the bracket cannot be seen while the blind is up, then I wouldn't take them down, just paint up to them; it's okay if you get a little paint on the brackets since you won't see them anyway, but don't get a lot of paint on the bracket or you may not get the blind back up.
If you do take the blind brackets down, make sure you label the brackets as you take them down and mark exactly where they go.
cabinet hardware
Cabinet hardware should be treated the same as blind and curtain holders. Remove and carefully mark exactly where the hinges, knobs, or handles were removed from. Cabinet hinges are adjustable and each hinge will be adjusted differently. It's important to mark exactly where the hinges go.
bathroom hardware
I like to remove all bathroom hardware, but you could tape it up. Most newer hardware is installed with Allen screws. With older hardware, you may need to use a very small screwdriver.
I will always tape and mark exactly where each piece of hardware goes. Make sure you tape over the holes on the walls so you do not fill them with spackle while prepping.
covering hardwood and/or tile floors
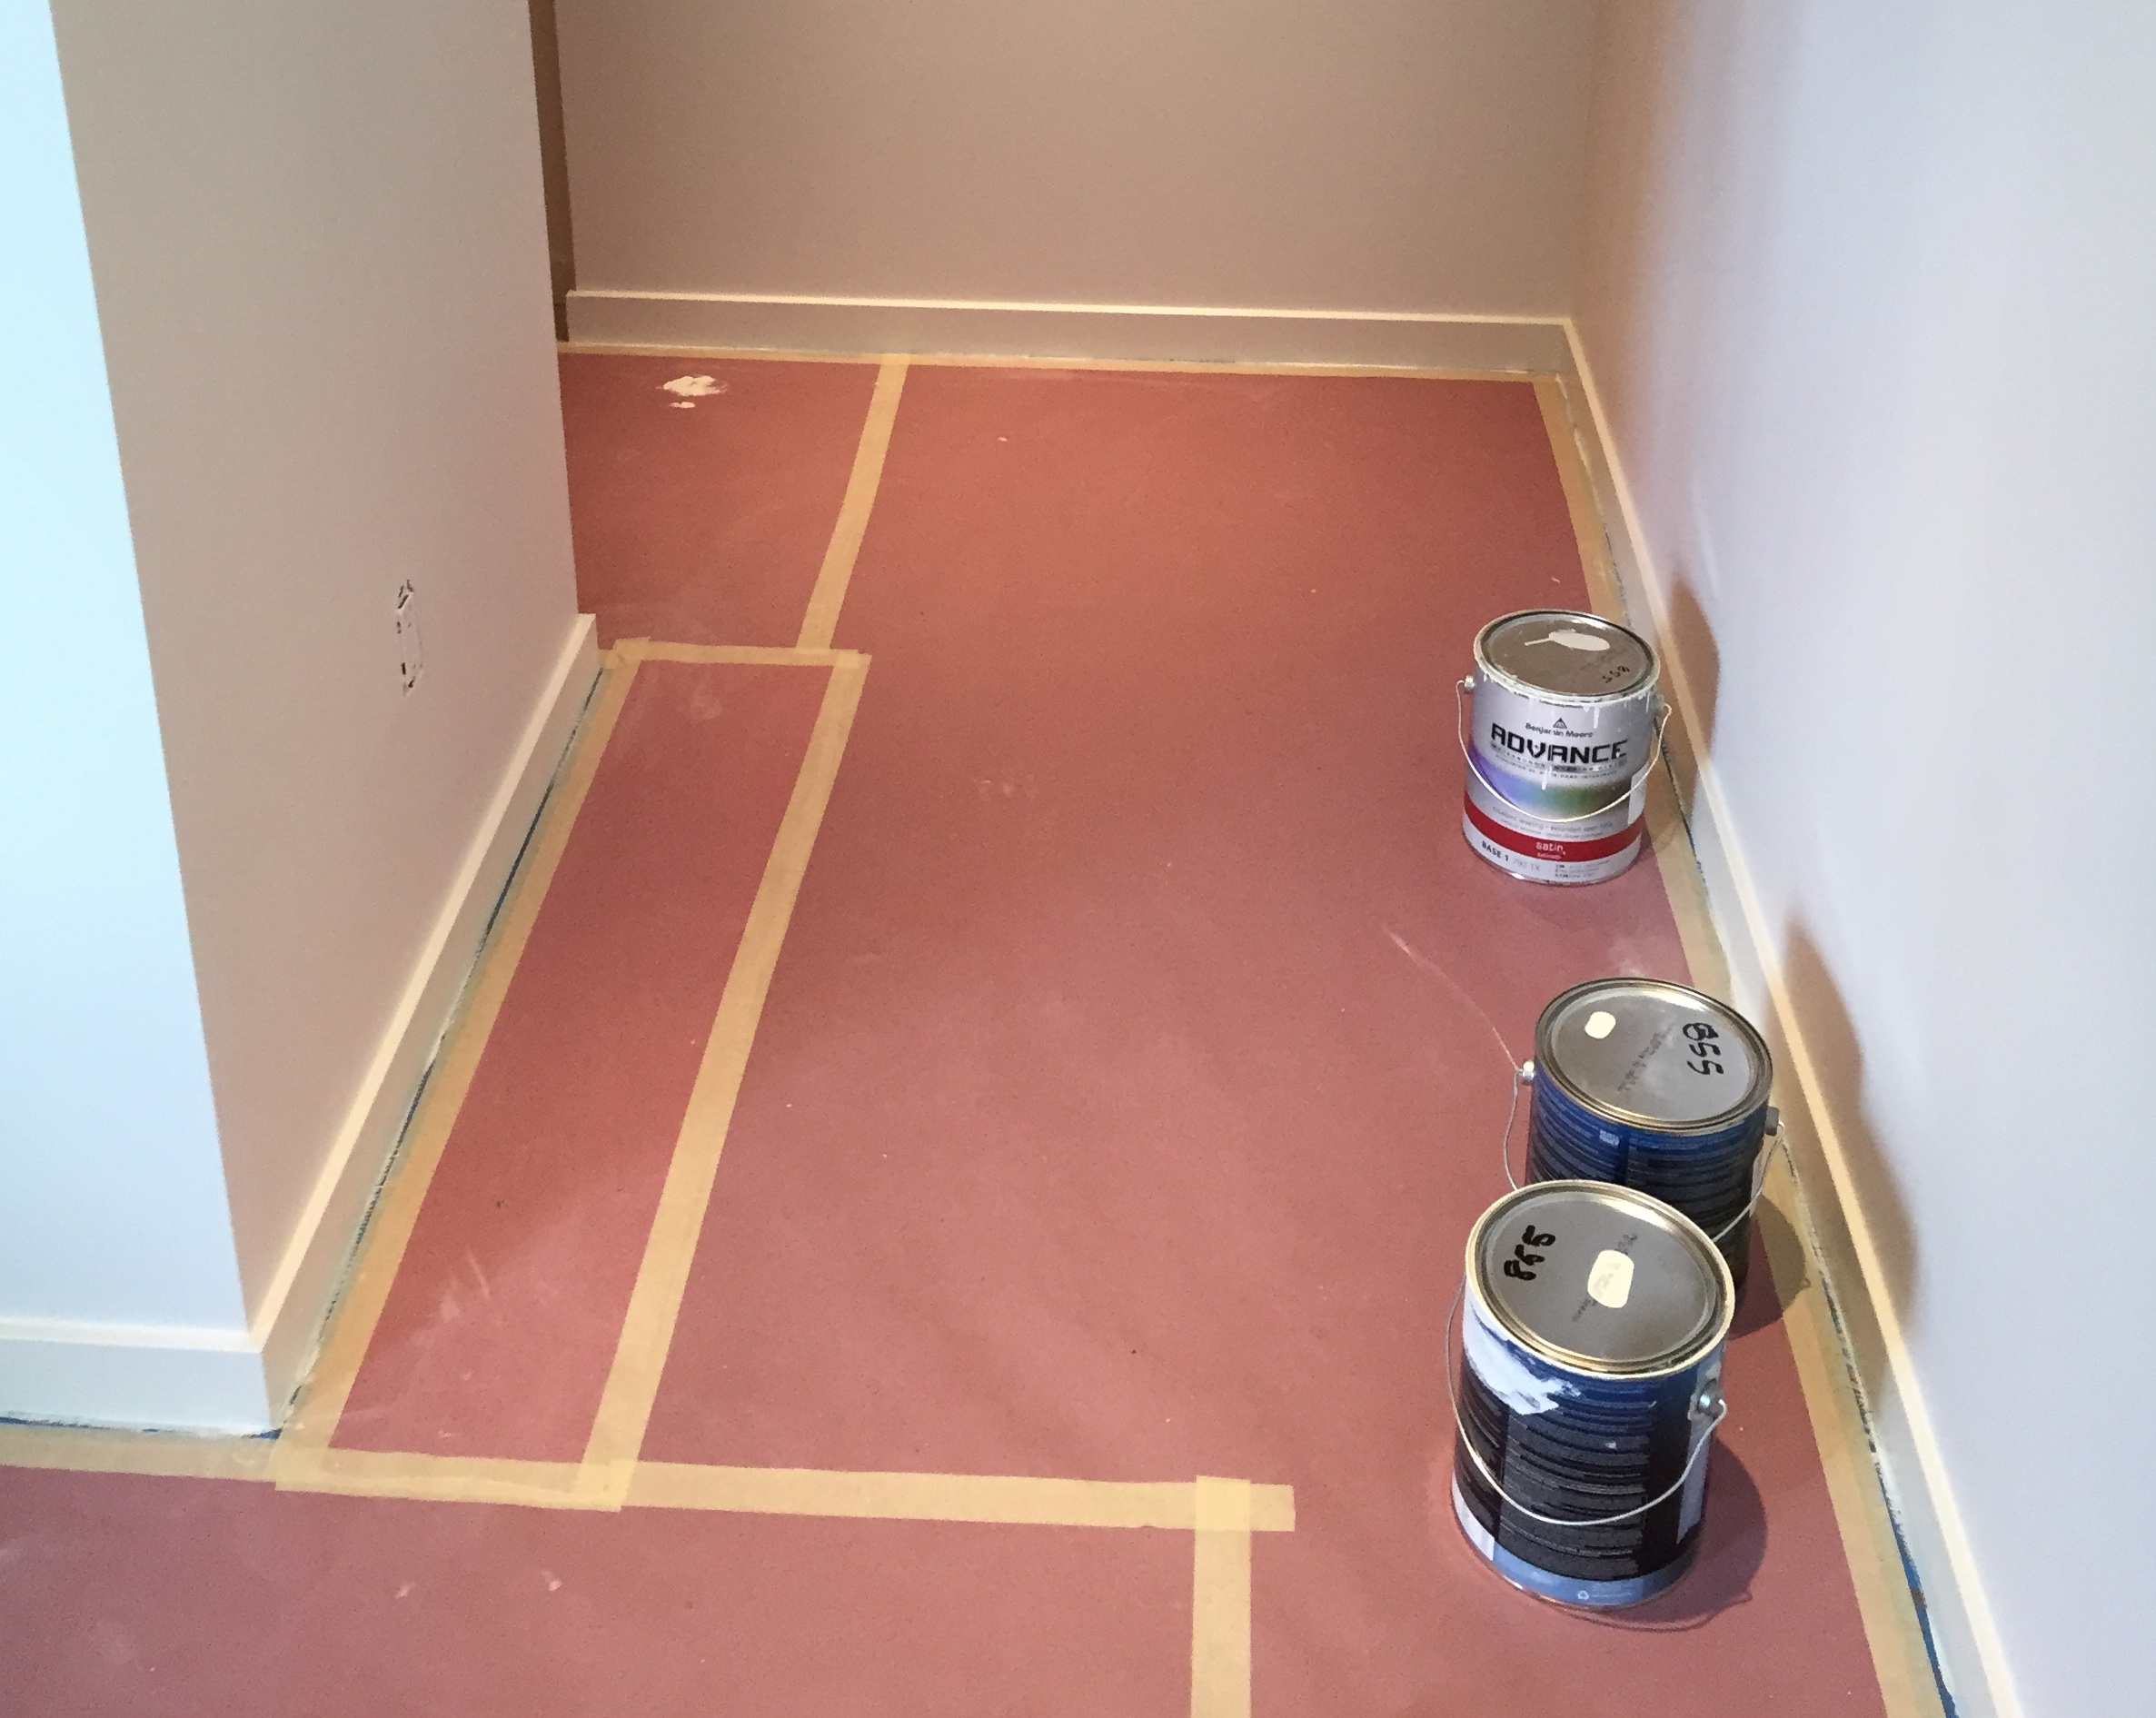
When I am painting the walls, ceilings, and trim, I like to cover everything up. I cover the floors with craft paper or plastic, then cover all the furniture with plastic. This way when I am prepping and painting, I don’t have to worry if I make a mess.
I'm not a fan of using tarps because they move around too much when you walk on them leaving gaps exposing the floors. They can also wind up against the trim, which I find to be annoying. I like to tape down whatever I am using to protect the floor so I don't have to worry about it when I am walking over it.
If you are only going to be painting the walls, you don’t have to do everything I’m about to show you and I’ll let you know where to stop.
I usually cover up the hardwood and/or tile floors with craft paper as it holds up much better than plastic. If you decide to use plastic on the floor, that is fine. I will be describing how to install the craft paper, simply substitute the same process with plastic.
Start by taking the blue safe release tape and tear off a piece about 2 or 3 feet long. Carefully take the tape and try to slide the tape under the baseboard. If you cannot slide it under, just get it as tight to the base as possible, but make sure the tape is not rolling up on any part of the baseboard.
If you are not painting the baseboard trim, you don’t have to be nearly as careful with the tape, just lay it next to the trim making sure there is no exposed floor between the trim and the tape.
Once the entire perimeter is taped off, you can start laying down the craft paper. Starting on one end of the room, roll the craft paper out. You can put a heavy object on the one end of the paper so it doesn’t roll back up on you. Be sure that it overlaps about ½ inch of the blue tape. Run it down the entire wall or section before you tape it down. You don't want to start taping it down while you are rolling out the craft paper in case the paper begins to run off at an angle to the wall. Cut the paper to length. Line up the paper so it's overlaying the blue tape by about 1/2" all the way down the wall, then take the masking tape and tape the craft paper to the blue tap. Continue until the perimeter of the room is done.
If you have central heating, make sure you do not cover the heater vents or, especially, the cold air returns. The latter is vital to your heating/cooling system.
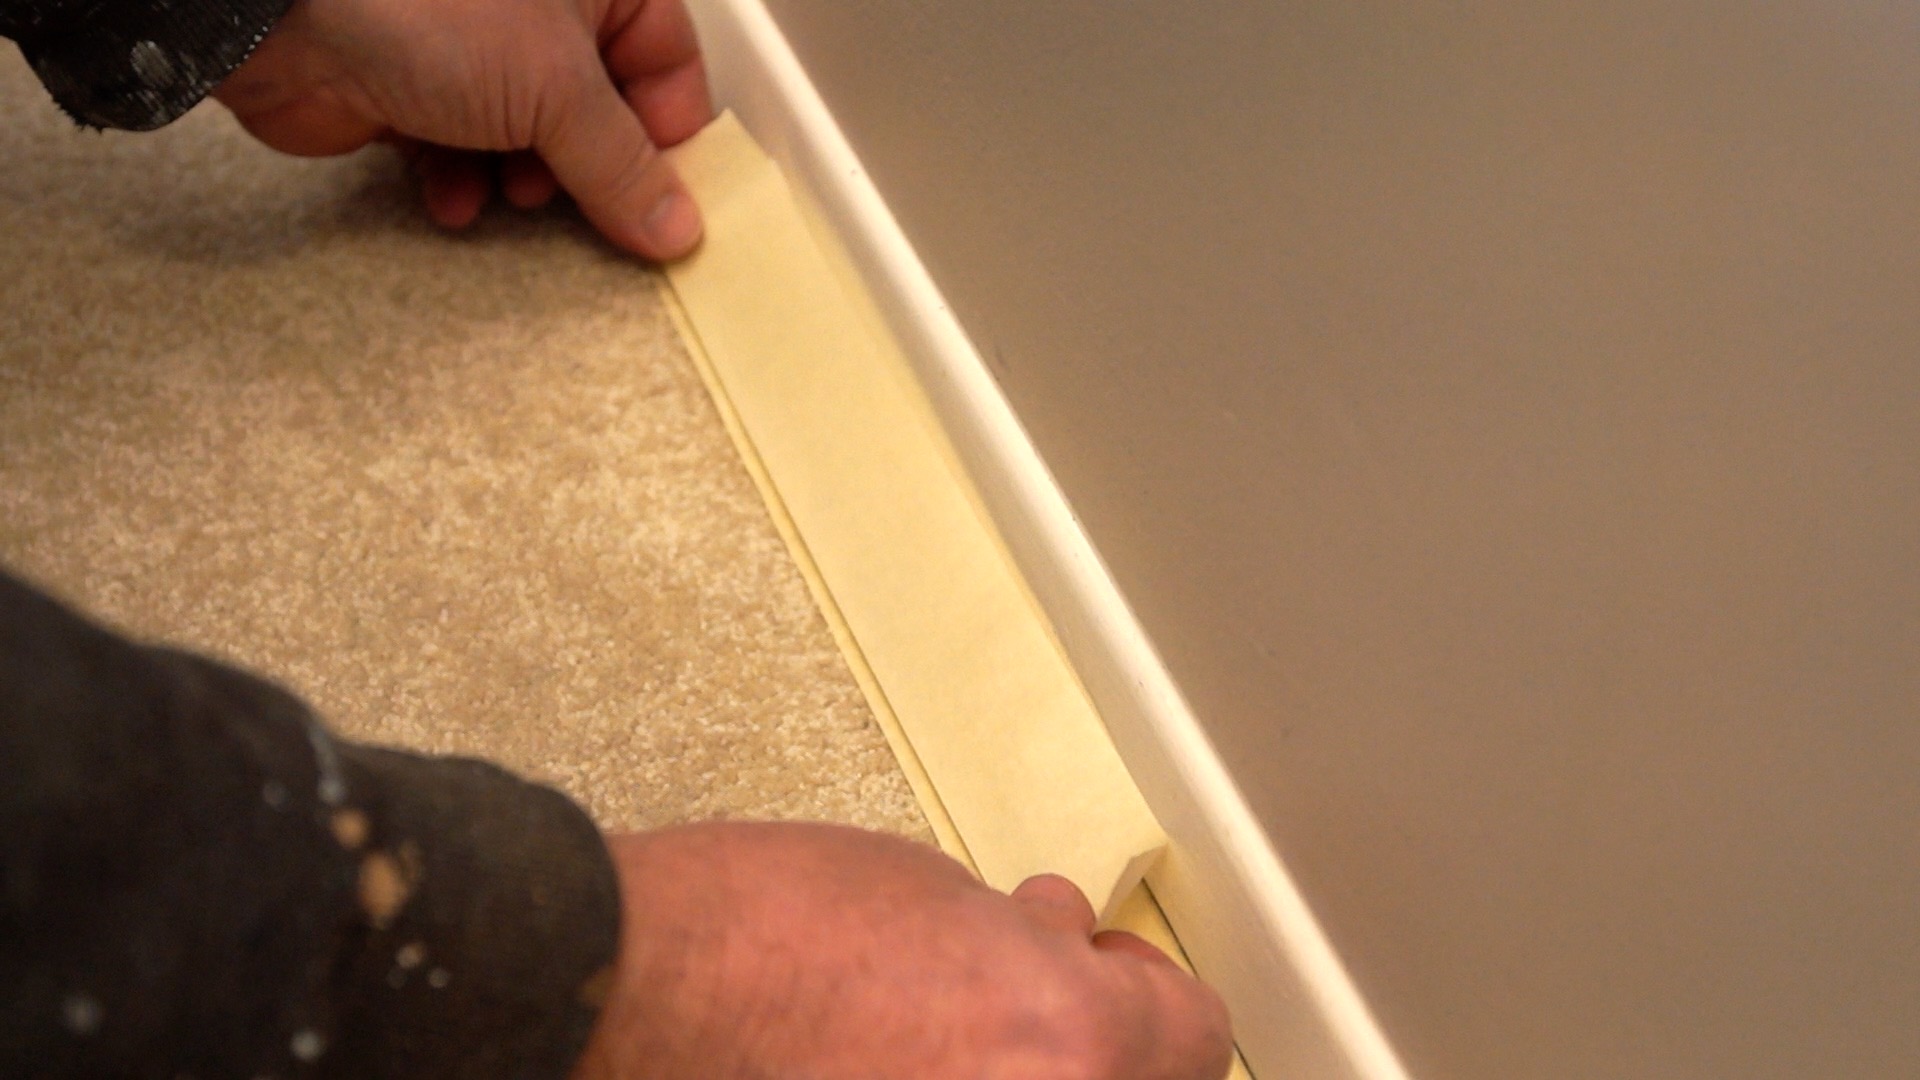
covering up carpet
When protecting carpet I like to use a carpet protector, but know it is more expensive than plastic and can be difficult to use. However, once carpet protector is in place, it is fantastic to work over. Most of the time, I will run carpet protector around the perimeter of the room and use plastic to cover the rest. Since the perimeter of the room will receive the most traffic, it's ideal.
Whether you use carpet protector or plastic, start by taking masking tape (do not use expensive tape for this), rip off a 2 or 3-foot section and place the tape on the carpet parallel the trim, rolling the tape up onto the trim about 1/8."
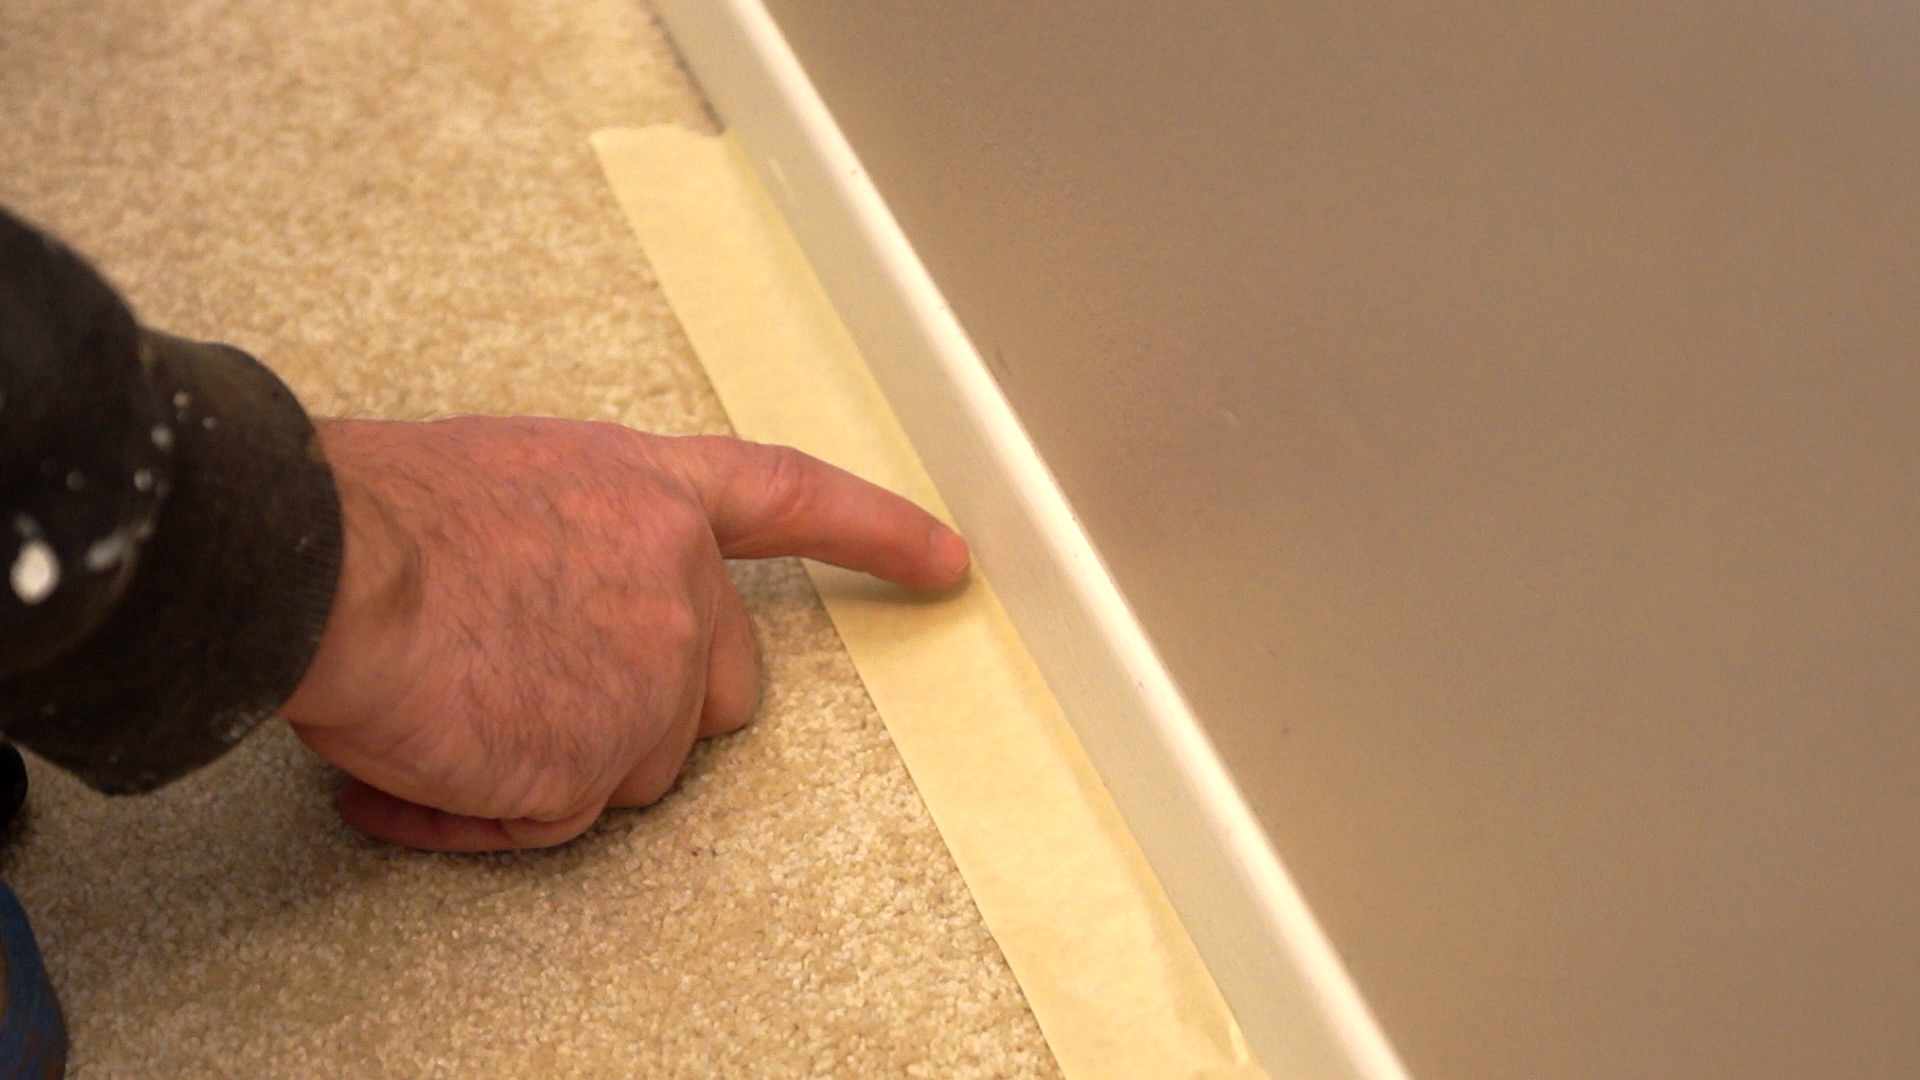
Take your hands, spread your fingers about an inch apart from each other, then place your fingers on the tape. While pressing down, pull the tape towards you, then push the tape back down under the baseboard. You could also use a putty knife to help push the tape under the baseboard.
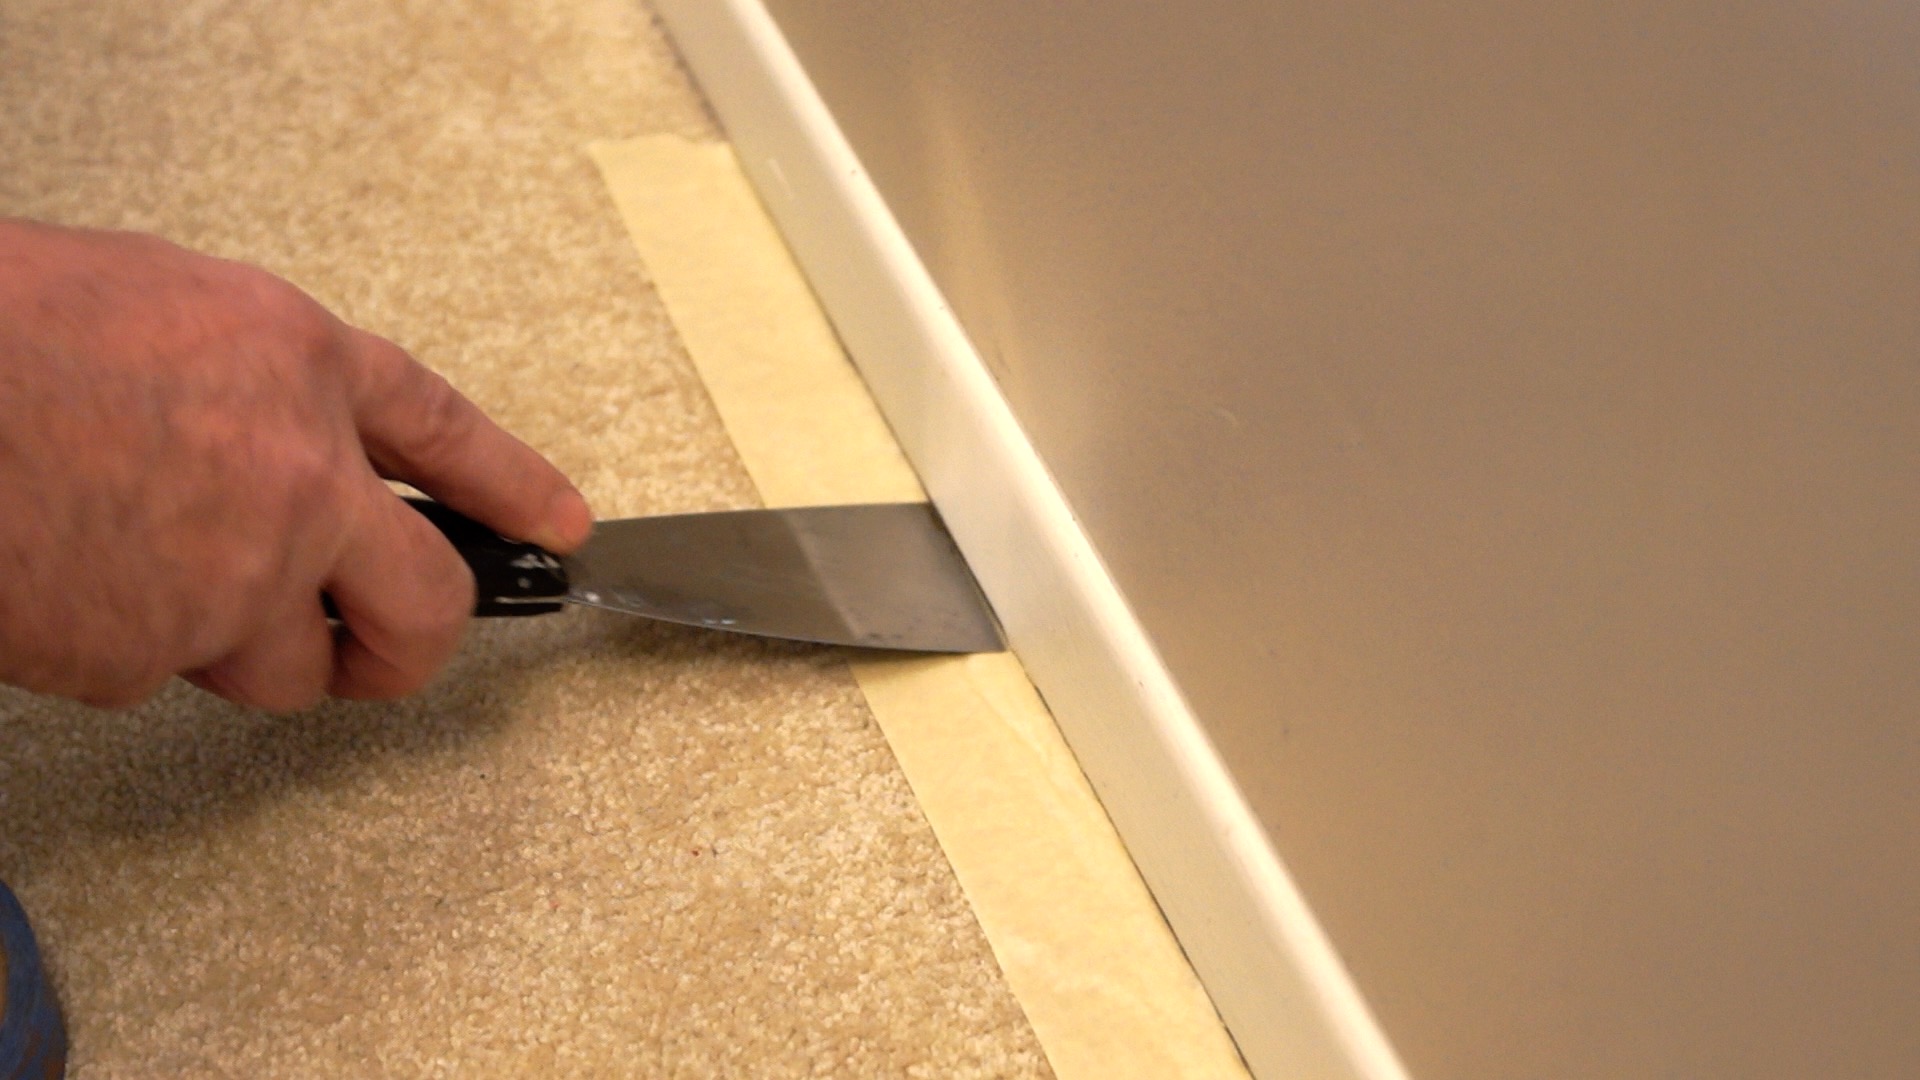
Now, what I like to do here is apply another piece of tape. This time, place the tape about a 1/8 of an inch inside the outer edge of the first layer of tape and lay it down. Using your hands or a putty knife, push the excess tape back down under the baseboard. Doubling up on the tape like this gives it more rigidity. This also helps to keep the paint from getting behind the tape and on the carpet.
Take the carpet protector and pull out about 6 or 8 inches. Lay the 6-8 inch section on the floor overlapping about half of the masking tape. Put your knees on the carpet protector to hold it in place. Take the roll in your hands and pull, in an upward motion while keeping your knees firmly on the carpet protector, 2 or 3 feet out, then lay it down on the carpet.
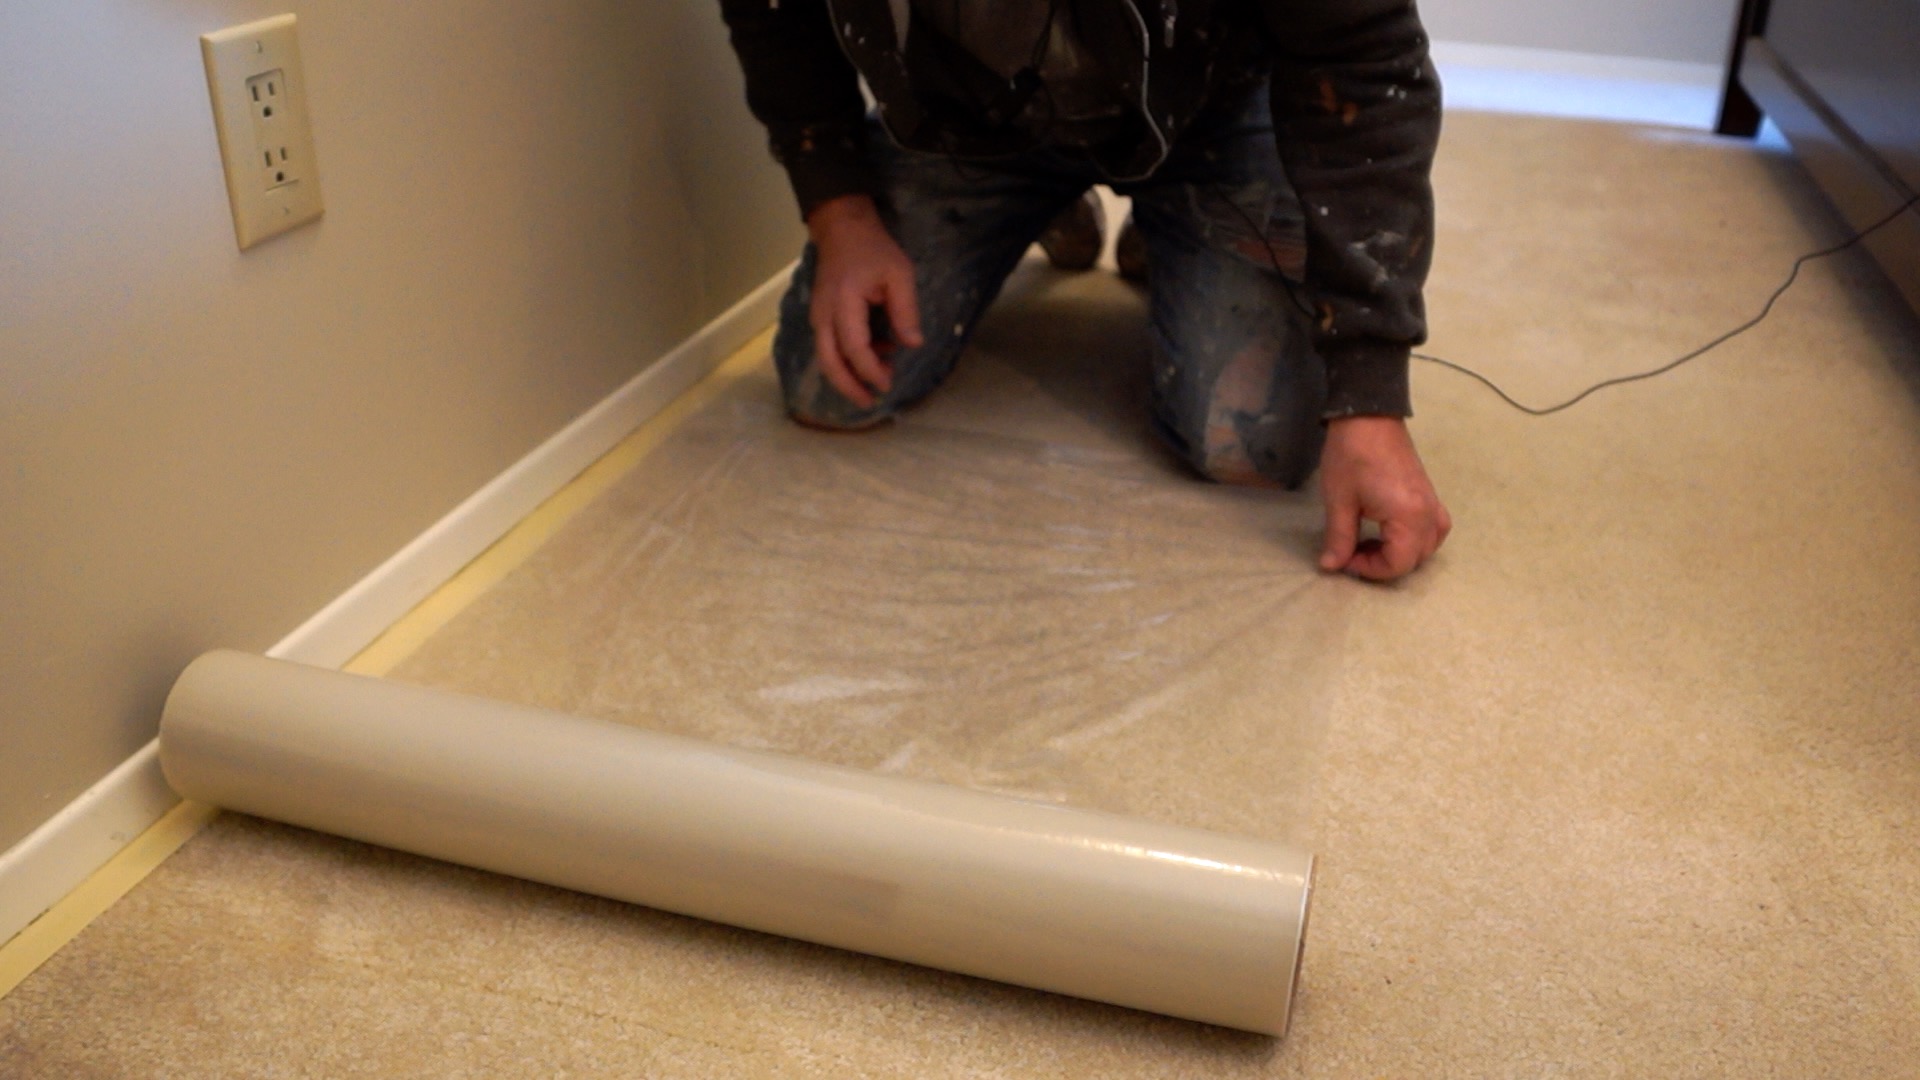
Make sure you lay it down nice and loose; if you lay it down tight, then walk on it, it will pull up the tape. Continue on until you have completed a run. Now cut the protector to size with a razor blade. Finally, take some more masking tape and tape the protector to the masking tape you laid down earlier.